Everything You Need to Know About “This PC Can’t Run Windows 11” Error (2021)
Here, we have first discussed the issue and then provided a solution. In case the solution does not work for you, move to the last section for a possible explanation as to why this issue is popping up.
Why is PC Health Check App Throwing “This PC Can’t Run Windows 11” Error Even on Modern PCs
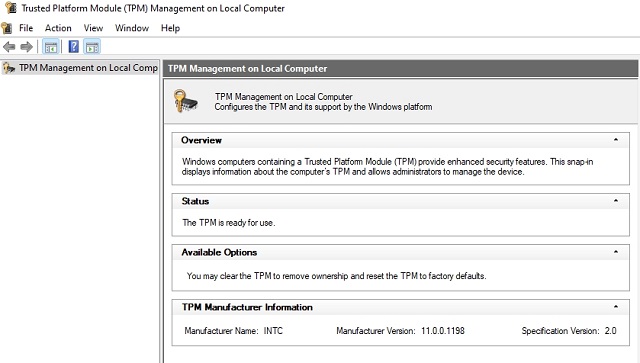
With Windows 11, Microsoft wants to tighten security on its operating system. And the work to build a secure Windows had started way back in 2017. Microsoft mandated OEMs to pack a TPM module (it’s a kind of security chip) on their laptops and desktops. TPM module is responsible for protecting passwords, managing Bitlocker, authenticating credentials, and more. So at least since 2017, every Windows machine comes with a TPM module, either TPM 1.2 or TPM 2.0. The problem is that most PCs have kept the TPM module disabled by default, and that’s why the PC Health Check app keeps showing the “This PC Can’t Run Windows 11” error. You can check TPM availability by pressing Win + R shortcut and running tpm.msc.
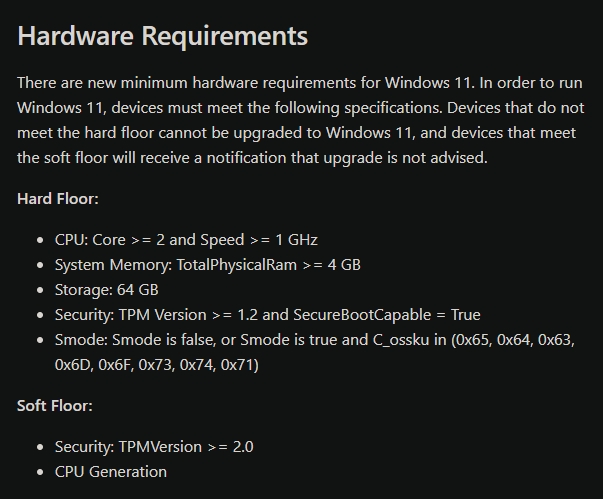
Apart from that, there seems to be confusion regarding the TPM version. Microsoft says the minimum requirement for running Windows 11 is TPM 2.0. However, the official Compatibility doc for Windows 11 says there are two Floors: Hard Floor and Soft Floor. Under the Hard Floor, even if the TPM version is 1.2, Windows 11 will still work.
Fix “This PC Can’t Run Windows 11” Error in a Few Easy Steps
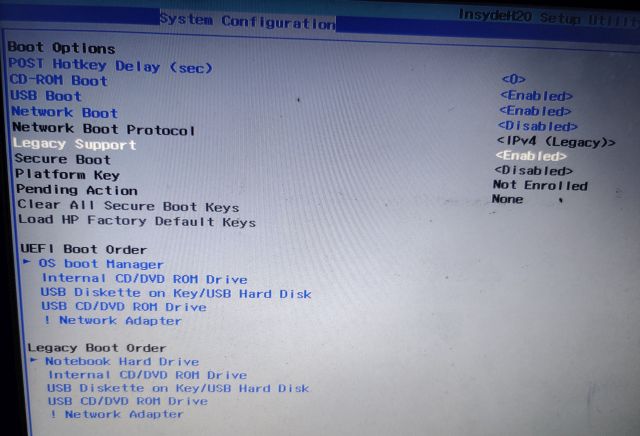
First, you need to boot into the BIOS or UEFI interface of your PC. You can do this by pressing the boot key continuously while your computer starts up. Note: For HP laptops, it’s generally the “Esc” or “F10” key. As for other laptops and desktops, the boot key may differ. So make sure to find the specific boot key for your computer from the internet. If you are using a custom-built desktop, the boot key depends on the motherboard manufacturer.
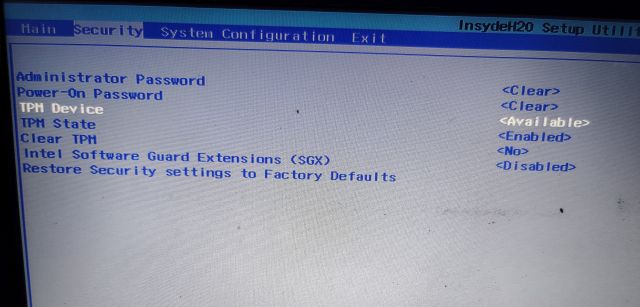
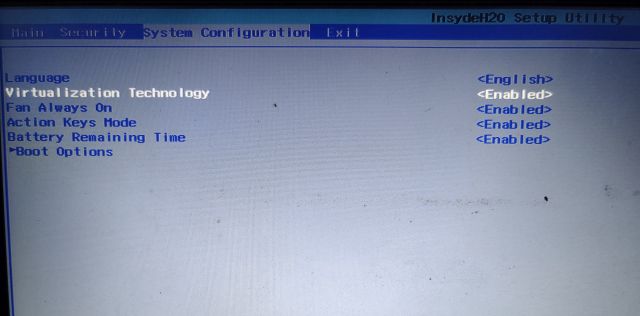
Once you are in the BIOS/ UEFI interface, look for something called “TPM” or Trusted Platform Technology. It’s also called PTT (Platform Trust Technology) on some Intel-based machines. On AMD machines, you might find the mention of fTPM in the BIOS menu. Look around, dive into the Advanced Settings and make sure it’s enabled or “available”. There might be TPM State as well, so go ahead and enable it.
Next, find the “Secure Boot” option under different menus and enable it. If the Secure Boot option is greyed out, you need to set a password in BIOS. Some laptops don’t allow you to enable Secure Boot unless you set a “Supervisor” or “Administrator” password. So set the password first, and then you can enable Secure Boot. Needless to say, you need to remember the password, else you will be locked out of your computer and won’t be able to access the BIOS.
Finally, some users have reported that enabling “Virtualization” in the BIOS/ UEFI does the trick for installing Windows 11. So look for one of these options: “Intel Virtualization Technology” or “Virtualization Technology” or “Intel VT-x” or “AMD-V” or “SVM Mode” in your BIOS settings. Simply put, if you find anything along the lines of Virtualization, enable it.
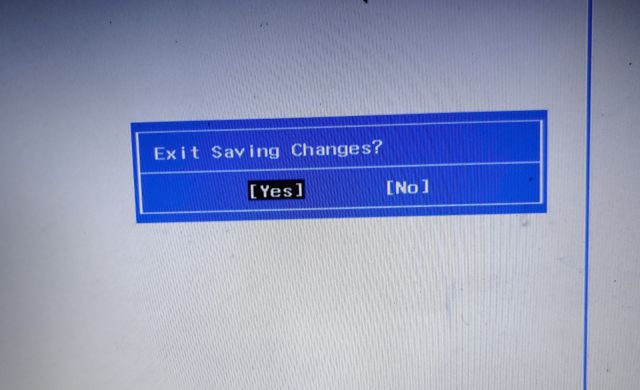
Now, press “F10” and hit enter to save and exit. F10 is generally reserved for “Save and exit”, but the key may differ for your computer. We suggest you check it on the BIOS/ UEFI footnote.
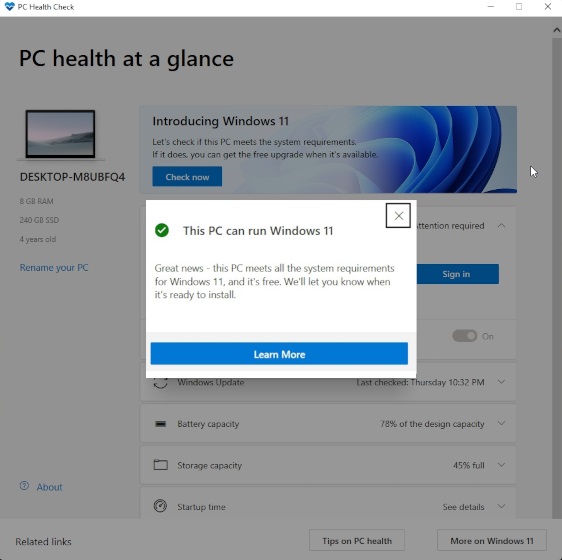
Now, your computer will reboot to Windows 10. Open the PC Health Check app again and click on “Check Now“. This time, the “This PC Can’t Run Windows 11” error should be gone. You should see the “This PC can run Windows 11” message now.
If you face the “This PC Can’t Run Windows 11” error even after enabling TPM, Secure Boot, and Virtualization, move to the next section for a possible explanation.
Is Your Windows 10 PC Still Incompatible with Windows 11 Even After Enabling TPM?
If you meet all the hardware requirements for running Windows 11 and still get the same error, it’s most likely to do with the CPU. Microsoft has released a list of Windows 11-compatible processors for both Intel and AMD. From the looks of it, major Intel Core processors such as i3, i5, i7, i9, etc., are supported, but you must be running an 8th-Gen (released in 2018) or above CPU to install Windows 11, which is a shocker. Basically, if you have an Intel processor below 8th-gen, you won’t pass the Windows 11 compatibility test. On the other hand, Windows 11 is compatible with AMD processors, including Athlon, EPYC, and the Ryzen processor series. Interestingly, Windows 11 supports Ryzen processors that are built on Zen+ architecture or above. Basically, all AMD processors released after 2018 support Windows 11. So the bottom line is – if you are running an 8th-Gen or higher Intel processor or AMD processor built on Zen+ architecture, you are officially eligible to get the Windows 11 update, assuming your machine meets other requirements I have mentioned above. As for when you will get the Windows 11 update, be it the Insider preview build or stable release, find the answer in our linked article. If you pass even the CPU test and still the app throws an error, it’s most likely a bug. Steve Dispensa, VP of Product Management at Microsoft, confirmed that a new update for the PC Health Check app is coming soon. Perhaps, you should wait for the update and check if your PC is compatible with Windows 11.
— Steve Dispensa (@dispensa) June 25, 2021 Having said all of that, if your PC is indeed unsupported by all Windows 11 yardsticks, meaning you are on an older CPU or don’t have a TPM chip, there is nothing to worry about for now. Microsoft will itself provide Windows 11 updates to Windows Insiders who don’t meet the requirements, so there is definitely a way to run Windows 11 on unsupported devices. We just need to wait and see if Microsoft decided to ease the restrictions as we go along or the developer community finds ways to install Windows 11 on unsupported machines (barring 32-bit PCs). As far as I can tell, older CPUs are more than capable to run Windows 11.
Find the Fix to “This PC Can’t Run Windows 11” Error
So that was our detailed guide and explainer on why the PC Health Check keeps throwing the incompatibility error. As I have mentioned above, if you face the same issue even after enabling all the system requirements, it’s most likely because of an unsupported CPU. Anyway, that is all from us. If you want to find out the official Windows 11 system requirements and what features Microsoft has removed from Windows 11, head over to the linked articles. And if you have any questions, do let us know in the comment section below.