Install Windows 11 on VirtualBox (2022)
We have included steps to enable virtualization, create a Windows 11 virtual machine, and finally, install Windows 11 on VirtualBox 7.0 in this guide. Let’s look at the step-by-step process in this guide:
Enable Virtualization on Windows 11
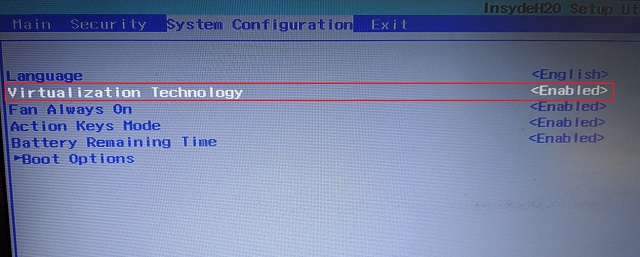
- To install Windows 11 on VirtualBox, you first need to enter the BIOS/ UEFI on your Windows 11 PC and enable Virtualization. Simply restart your computer and boot into BIOS or UEFI. Usually, the boot key is F10 or F9, but it can vary depending on the PC manufacturer. So if you are not sure, look for the boot key for your motherboard or laptop manufacturer on the internet. You can also check out the list attached below.
- Generally, you would find the “Virtualization” option in the System Configuration or Advanced tab in the BIOS. All you have to do is enable the feature and save the changes. After that, restart your computer, and virtualization will be enabled.
Create a Windows 11 VM on VirtualBox
- First, you need to download VirtualBox 7.0 for Windows from its official website. The setup executable is only around 100MB in size, so that’s good. Next, run the EXE file and install VirtualBox 7.0 on your Windows 11 PC.
- Once you are through the installation, open VirtualBox and click on “New”.
- Then, set a name for your Windows 11 virtual machine. I have simply called it “Windows 11”.
- After that, under “ISO Image”, select the Windows 11 ISO image you have downloaded. To learn how to download Windows 11 officially for free, head to our guide linked here. Now, enable the “Skip Unattended Installation” checkbox and click “Next”.
- Next, allocate the amount of RAM you need for your Windows 11 VirtualBox installation. As per Windows 11’s minimum requirement, you need to assign at least 4GB of RAM. As for CPU count, assign 2 or more cores, depending on your hardware. Make sure to turn on the “Enable EFI (special OSes only)” checkbox.
- Following that, select “Create a Virtual Hard Disk Now” and allocate at least 64GB of storage. If you have more disk space, you can assign more.
- Finally, click on “Finish“. You are almost ready to install Windows 11 on VirtualBox.
How to Install Windows 11 on VirtualBox
Now that you have created the virtual machine, let’s boot it up and go through the Windows 11 installation process:
- In the VirtualBox Manager window, choose Start -> Normal Start.
- Now, the Windows 11 installer will appear on your screen in a few seconds. You can go ahead and install Windows 11 on VirtualBox like you usually do.
- As you can see, the VM installation didn’t show TPM or Secure Boot errors. So complete the OOBE setup, and you are good to go. If you want to create a local account on Windows 11 during installation (for both Home and Pro editions), follow our linked guide. Note: VirtualBox 7.0 comes with virtualization support for TPM 1.2 and 2.0 and Secure Boot, which makes installation easier. However, if you are using an older version of VirtualBox, you’ll need to rely on workarounds to bypass Secure Boot, TPM, and RAM requirements while installing Windows 11 on your computer.
Bypass TPM and Secure Boot to Install Windows 11 on VirtualBox Easily
So these are the steps you need to follow to install Windows 11 on VirtualBox without using workarounds to bypass the TPM or Secure Boot requirements. As mentioned above, you don’t need to use Registry hacks or any other workaround on VirtualBox 7.0. Anyway, if you’re not satisfied with VirtualBox and are looking for the best VirtualBox alternatives, head to our curated guide linked here. And to run an Android VM on VirtualBox, follow our detailed guide. Finally, if you have any questions, let us know in the comment section below.
